Hold on to your hats! I am so excited to show you this amazing new PowerPoint feature in a new group called Captions and Subtitles. This life changing tool will caption your words during your presentation as you are speaking… and that is just the beginning. This tool really needed a video to showcase what it can do, so keep scrolling to check out a short video.
Live Subtitles in PowerPoint
Take a look at the video below, where I demonstrate the feature. Then there are a couple notes for you after…
How do I obtain access to this amazing wizardry?
This feature is only available for the Office 365 versions of the PC desktop application. If you are running 2016, you would need to request an upgrade (see below). Even with the 365 version, many people don’t have this feature yet, but don’t worry, it is coming soon! Here is what you can do:
If you are not using Office 365, contact the Help Desk (4357) to put in a ticket to have Desktop Support update your computer.
Even so, you likely will not see this feature yet, but hang tight, because you will see it soon with coming updates.
When it does appear, it will live on the Slide Show tab of the ribbon.
Thoughts?
What do you think? Is your mind buzzing with ideas? I would love to hear from you!
Congratulations, Power Users!
Congratulations to our newest Power Users! For the full gallery, and more information about the WSU Microsoft Office Power User Program, please visit: wichita.edu/poweruser
There are several options in Word for referencing a separate Word document. A feature I particularly like is called Insert Object. There is a lot you can do with the Insert Object feature, but one nice aspect is the ability to link (and sync!) text between two documents. Let’s see how this works.
Exercise Files
There are two files that will work together today:
The Welcome New Employees document contains a section that you would like to reference back to another Word document, Policy 55555. You would like for the Welcome New Employees document to update as your policy updates.
Since we will be linking these documents together, save both of these files to your desktop before going to the next step.
Insert Object
1. Open the Welcome New Employees document.
2. Place your cursor where you would like to insert the content from Policy 55555, at the end of the document.
3. Go to the Insert tab, Text group, and select the Object dropdown.
Note: if your screen is a smaller size, or the size of the Word window is reduced, you may only see an icon for the object in the ribbon.
4. Select Object from the dropdown.
5. In the tab at the top of the pop out screen select Create from File.
6. Press Browse to browse for the Policy 55555 document.
7. Check Link to File
8. Press OK
Inserted Text
Notice how this inserts the text with a frame around it. You cannot edit this text anywhere except in the source document, Policy 55555.
1. Double click on the frame to open the linked document in a new window.
2. Make a change to the source document. Instead of Sandy, change the contact to Hannah, and the phone number to 999 9999.
3. Save the Policy document and close it to see the change take effect in the Welcome document.
By the way, in the future you could always just open the linked Policy file, and make a change to it on its own. The change will take effect the next time you open the Welcome file… you may have to close and reopen the Welcome file if it is open when you make the change this way, though.
Notes
A few more things to note:
Be cautious of where you save or move your linked documents. They may need to be re-linked if you move them to new locations.
Insert Object also exists in PowerPoint. Imagine the possibilities!
If you choose to email the final file to people, or post it online, they will be able to see the latest linked text, but they will not be linked to the linked document (Policy in this example), nor will they be able to open the linked document. Only people who can access where the linked document is stored will be able to do that.
All bets are off if you export to PDF. The text will appear, but it will no longer be linked.
In other words, think of this as a feature to use with your master documents, to ensure consistency.
Thoughts?
Do you have a use for this nifty linked text feature? Also, like I mentioned in the introduction, this is only one aspect of the Insert Object feature. Feel free to explore and let me know how it goes!
Congratulations, Power Users!
Congratulations to our newest Power Users! For the full
gallery, and more information about the WSU Microsoft Office Power User
Program, please visit: wichita.edu/poweruser
In honor of the wizardry of technology, and because everyone should be having a blast during summer break, I made a fun exercise for us in Excel… a crystal ball… via the magic of Excel Macros.
To give credit where credit is due, this was inspired by an exercise Mr. Excel showed us at Excelapalooza last fall.
This magic involves macros, so if you want to use this crystal ball, you might be prompted to “allow macros” or “Enable Content.” If so, go ahead and allow them. And more on this later…
How to Use it
Alright, this is about a sophisticated as a Magic 8 ball,
which is to say, you will think of a yes or no question, then press the “Ask Me
Anything” button on the Crystal ball.
Your answer will appear in cell B2, next to the “Your Answer”
writing. Keep pressing the button for different answers (there are some good
ones in there).
Look Behind the Curtain
How did I do this? Let’s take a peek behind the curtain.
Unprotect Workbook
This is a protected workbook. Go to the Review tab and select Protect Workbook to toggle off the protection. I did not apply a password. This will allow you to discover a sheet I have sneakily hidden.
Unhide Sheet
Right click on the tab of the sheet (where you see the sheet name) and select Unhide.
Hey there is a hidden sheet in this workbook! This looks a lot like the results we have been seeing when we ask the crystal ball for answers. But where do these results come in to play?
Formula in B2
Go back to the Crystal Ball sheet and click on cell B2, where the results appear. Look up in the formula bar… it looks like there is a pretty nifty nested formula that is selecting a random number between 1 and 14 and matching it up to possible results.
If you want to learn more about nested formulas, come to one of my Excel Advanced Formulas sessions! Those of you who have attended before, I could have also used VLOOKUP on this cell, but for some reason I was feeling old fashioned and went with the old Match/Index one-two punch.
Macro
Okay, the hidden sheet makes sense, and the formula is
logical, but what does this button have to do with anything? How exactly does
this work? The answer is… Macros!
What are Macros?
Macros are basically a shortcut you create that will perform a series of commands. If you get tired of copy/pasting as values in Excel, you could make a macro button that would do that for you. I once talked to someone who consistently wanted to print only the first page of a document, so we made a macro that would do just that.This saved her a lot of clicks throughout the day.
Basically, any combination of commands, formulas, you name
it, you can create a macro for it. Macros use a special code called VBA (Visual
Basic for Applications). If you want to take a look at the super simple macro
behind this button, press Alt + F11
on your keyboard.
Now, don’t let this scare you off, macros can also be
recorded via a macro recording tool in Excel. You don’t have to learn VBA to create macros, though it can really help.
I Thought Macros Were Something Bad…
I hear this a lot. Sometimes you open a document and receive a stern warning about macros… you may have even received a message like this when you downloaded this exercise. Because macros carry coding for actions, they can hide malicious code from ne’er-do-wells. Think of it this way, macros are a tool, and any tool can be used for good or bad purposes. So if you download something from a source you are unsure of, and you want to be extra careful, don’t allow macros to run, though know this will possibly reduce functionality. But if you made the macros yourself, or it is sent to you from a trusted friend (like me), you are probably fine.
Are You Interested in a Macros Session?
This Byte was a super fly-by narrative about macros. A couple of you have told me you are interested in learning more about macros… if you would like to attend a session like this, let me know! If there is a lot of interest, maybe I can put something together. You can either comment on this post or send me an email. I always love to hear from you anyway.
Congratulations, Power Users!
Congratulations to our newest Power Users! For the full
gallery, and more information about the WSU Microsoft Office Power User
Program, please visit: wichita.edu/poweruser
Slicers are hugely popular in both Excel Essentials and
Excel Pivot Tables training. We go for standard slicers in both of those
sessions, but there is another type that is particularly fun to play with if
you are working with dates; the Timeline
Slicer.
This is… what else… some dessert sales! Desserts make their
way into a lot of my training exercises (wonder why?).
The Dessert Sales
sheet shows entries in checkbook style: date, dessert type, and then income and
expense on each day.
The Dessert Pivot
sheet is referencing data on the Dessert Sales sheet. You must have a pivot
table with dates in order to use the Timeline
Slicer tool. If you are not comfortable with Pivot Tables, check out my
session Excel: Pivot Tables, Charts and
Pictures, listed in MyTraining.
Create the Slicer
Go to the Dessert Pivot sheet
Click on the pivot table to activate Pivot Table Tools contextual tabs
Click on the Pivot Table Tools Analyze tab
In the Filter group select InsertTimeline
Select Date and press OK
Look at this nifty Timeline slicer you just created!
Working with the Timeline Slicer
Just like your standard slicers, you can click on a month to narrow down
information in the pivot table.
Notice you also have the ability to select a range of months by hovering your mouse
between two months and clicking and dragging.
To clear the
filter, click on the clear filter button at the upper right of the timeline
slicer.
Timeline Tools
Click on the timeline
to select it and notice this activates a Timeline Tools contextual tab.
Among other options,
you have the ability to adjust the size of the Timeline and change the color to
another available theme color.
Troubleshooting
Oh no, I sliced by a month and then accidentally deleted my slicer! How do I unslice my data?
Don’t forget that whenever you create a slicer, you are
creating a shortcut to filter. Notice how a filter appears at the top of the
row labels.
To clear this filter click on the filter button and select Clear Filter from “Months”.
Thoughts?
What do you think? How will you use the Timeline tool with
your workbooks?
Congratulations, Power Users!
Congratulations to our newest Power Users! For the full
gallery, and more information about the WSU Microsoft Office Power User
Program, please visit: wichita.edu/poweruser
In every Micrsoft Essentials training, we talk about customizing the Quick Access Toolbar (QAT). In a similar vein, did you know you can customize your Microsoft Ribbon as well? Indeed, you can create your own custom groups with those hard-to-find favorite features. This is just another way to save yourself a few clicks throughout the day… which we all know can add up to a lot of time. Let’s take a look.
Exercise File
There is no exercise file today, because you will be customizing the ribbon on your individual download of Microsoft Office. If you would like to follow along, open up a blank Word document.
Layout of the Ribbon
The Ribbon is made up of:
Tabs: e.g. Home, Insert, Design
Groups: printed at the bottom of each tab, e.g. Clipboard, Font, Paragraph
Commands: the buttons/features within each group
Throughout all our sessions, have also talked about how we see specific ContextualTabs, or ToolTabs, appear as we access certain features (pictures, tables, etc.). All of these can be customized.
How to Customize the Ribbon
Let’s say that you have been doing a lot of work in Word. You would like to make it easier to find Alt Text when inserting images. You also frequently find yourself adjusting Headers, Footers, and Page Setup options, and would like to save yourself a few clicks in finding these features.
Create a Group
Right click in a grey space on top of the ribbon and select Customize the Ribbon.
Notice this looks similar to the QAT customization screen, but this time Customize Ribbon is highlighted.
Highlight the Home tab on the right and press New Group at the lower right of the screen.
A new group will appear in the home tab list. Select it and press Rename to name it something else. I am going to name mine Special.
Add Commands
Let’s add a few commands to the Special group.
Select the Special group on the right pane.
On the Left Pane, change the dropdown from Popular Commands to All Commands.
Scroll down to Edit Footer. Select it, press the Add button between the two panes.
Do the same for Edit Header, and Page Setup
Once you click OK, you will see a new group with your custom commands.
Customizing a Contextual/Tool Tab
We added the previous commands to the Home tab in Word. We also would like to add Alt Text to the Picture Tools contextual tab. Contextual/Tool tabs are tabs that we don’t see until we select a specific object (like a picture) the document.
Note: if you are using Office 365, Alt text will already appear on the Picture Tools tab by default.
To customize the Contextual/Tool tabs:
Right click on the ribbon and select Customize the Ribbon
On the right pane, change the dropdown from Main Tabs to Tool Tabs.
Find the Picture Tools tab and select the only group (Format).
Follow the instructions above to add Alt Text to your picture tools tab.
Remove Commands
You will not be able to remove the default commands from the ribbon, but if you would like to remove commands that you have added yourself, you can do so easily:
Right click on the ribbon and select Customize the Ribbon.
Highlight the command or group (in our case, Special) on the right pane
Press the Remove button between the two panes
Ideas
Remember, this works in all your Microsoft Office programs, not just our Word examples above. I am sure there are special features you wish you could access more easily, so I can’t wait to hear what you decide to do! A few I have added to mine are:
Outlook: Journal Feature to the Home tab (and QAT, because I am extra).
All Programs: Alt Text to the Picture Tools tab
As I mentioned earlier, in Microsoft 365, Alt text will appear on the picture tools tab by default, but if you are on 2016 or earlier, it can be a huge time saver to add it yourself.
Excel: Set Print Area to the Home Tab
Thoughts?
How will you customize the ribbon on your Office programs? I would love to hear which commands you decide to add!
Congratulations, Power Users!
Congratulations to our Power Users! For a full gallery, and more information about the WSU Microsoft Office Power User Program, please visit: wichita.edu/poweruser
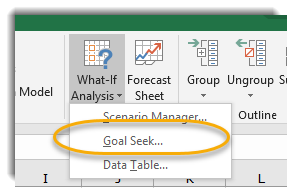
Excel has several built-in forecasting features that can be excellent tools for planning and strategizing. The feature we are going to examine today is called Goal Seek. Goal Seek allows you to work with related figures and determine how much one value would need to change in order for another to meet a goal.
In other words, if you know what number you would like to attain in one cell, but don’t know what input value is needed in a related cell to reach that number, this is the tool for you. Let’s take a look.
Exercise File
If you would like to follow along, here is the exercise file: GoalSeekExercise
Scenario
What are we looking at here? These are recruitment numbers for some fictional colleges on campus. FY19 enrollment headcount is in column B, and you would like to calculate goal enrollment for FY20 in column C.
Column C contains formulas that will calculate an increase in percent based on what you input into cell F1. Go ahead and test it out. What happens To column C if you type 5 into F1?
So an increase of 5% would mean all enrollment figures would increase as shown.
Goal Seek
That formula is nice, but your real hope is to Goal Seek. You would like to figure out how large of a percent increase would be required to raise total enrollment (C6) to 3000.
Select Cell C6 by clicking on it.
Go to the Data tab, Forecast group, and select What If Analysis.
Select Goal Seek
In the pop screen that appears:
Set Cell should already read C6, since that was the selected cell.
To Value: this is our enrollment goal, which was 3000, so change that to 3000.
By Changing Cell: select cell F1 (next to Increase Enrollment By) or type F1 in the space provided.
Basically, we are saying we want to see what the percent increase would need to be for our goal of 3000 students to be reached.
Press OK. Excel should work out our calculation from here…
Interesting! It looks like enrollment will need to increase by 24%. And each college’s appropriate rate is lined out with their needed increases.
One quick note, all these cells are rounding to the next whole number, so figures are not exact (we can’t recruit a percent of a student after all).
In the pop up that appears either press OK to accept the change, or Cancel to go back to the original numbers.
Thoughts?
Where could you put this to use in your office? Let me know what you think!
Congratulations, Power Users!
Congratulations to our newest Power Users! For the full gallery, and more information about the WSU Microsoft Office Power User Program, please visit: wichita.edu/poweruser
PowerPoint has a lot of aesthetic features, so it can be easy to become so focused on the visual aspects of a presentation that we forget about what is happening behind the scenes. A slide deck can appear perfect from a visual perspective, but definitely still have a long way to go internally. Let’s take a look.
This is a (very important!) presentation about Star Trek characters. It consists of a title slide and three additional slides with content. At first glance, It looks like all the content slides are laid out identically, but they are actually quite different.
Selection Pane: Reading Order
Similar to Accessibility settings that we talk about in Acrobat DC Essentials training, there is also a Reading Order to PowerPoint documents.
Someone in your audience may be visually impaired and accessing your PowerPoint with a screen reader. The Reading Order is the order the screen reader will read the contents of the slide. How do you access the reading order? Via the Selection Pane.
Select Slide 2: The Original Series.
In the Home tab, Drawing group, select the Arrange dropdown and select Selection Pane
A menu will appear on the right. This is the Selection Pane displaying the Reading Order.
Important: reading order is from bottom to top! So in the case of Slide 2, the Title is on the bottom, where it should be if it is to be read first.
Click on any of the items in the Selection Pane to highlight their location on the slide. Or, click on any item in the slide to see it highlighted in the Selection Pane. Items may be reordered by clicking and dragging.
Outline View
I mentioned that all these slides appear identical, but they are actually set up differently. One quick way to see this is to change your View to Outline View.
Go to the View tab, Presentation Views group, and select Outline View.
Notice how slides 3 and 4 are missing something very important: a title! Titles are indicated in bold next to the slide number.
But wait, what is going on here, I was sure I saw titles on those two slides?
Let’s return to Normal view and investigate. Go to View tab, Presentation Views group, and select Normal.
Layout
Select Slide 3: The Next Generation.
Take a look at your Selection Pane on the right (if you left that view from earlier, you can get it back by following the steps under Selection Pane above). Where is the Title?
Click on to the title words in the slide (The Next Generation). Notice this highlights a Text Box in the Selection Pane on the right. It looks like someone has deleted the title box on this slide and inserted a text box. This means that:
The reading order is out of order… it could be reordered by clicking and dragging, but…
There is also no official Title on this slide. Fixing the lack of title will actually fix both issues.
Let’s first confirm the correct Layout is selected. Go to Home tab, Slides group and select the Layout. It looks like Two Content is selected. Since there is both text and a picture, this makes sense. Let’s not change this, but it is good that we confirmed it.
The real issue is that the Title got deleted and replaced with a text box. Let’s fix this. Start by deleting the imposter title: click on the text box that contains “The Next Generation,” then click on the line of the text box to select the whole text box. Press the Delete key to completely remove this imposter title.
Go back to the Slides group and select Reset. This is going to reset the current slide into its original two content layout, while keeping the content.
A true title box appears. Retype your title into the new title box. Notice the selection pane is now correct, in that there is a title, and that the reading order has been corrected.
Change Layout
What about Slide 4? Let’s follow the same steps as above.
Under Layout, I noticed the wrong layout is selected. It is currently a Title and Content and should be a Two Content. Let’s change this slide to a Two Content.
Notice this causes the slide to reset. The fake title text box may need to be deleted to make room for the real title.
Side note: you might be noticing right about now that remediation is a lot harder than creating a slide correctly to begin with. This is almost always the case, regardless of the program you are using!
Once slides 3 and 4 are corrected, revisit Outline view, and notice the new look! Titles on every slide, what a beautiful sight!
Accessibility Checker
Another way to find these layout issues is by running an Accessibility Checker. A full write up of how to work with this feature may be found here: Accessibility Checker Article
Go to File, Check for Issues, Check Accessibility.
When a number of text boxes are found on a slide, the checker will remind you to check your reading order. Click on the dropdown next to this warning to access the same Selection Pane a different way.
Thoughts?
Did you know about these tricks for checking slide layout and reading order? How will you put this to use?
Congratulations, Power Users!
Congratulations to our newest Power Users! For the full gallery, and more information about the WSU Microsoft Office Power User Program, please visit: wichita.edu/poweruser
Automated numbered lists are a feature a lot of us take for granted in Microsoft Word…. They usually work seamlessly and automatically, but sometimes these lists can work against us: restarting a list of numbers at 1 when we mean to continue our list, or picking up formatting that we can’t seem to shake, like creating all bold numbers in spite of unbold text. Don’t despair; these little inconveniences are remarkably simple to fix.
Exercise File
To follow along, you may download the exercise file: NumberedLists
This file contains a fascinating list of silly words laid out in series of numbers lists. Let’s take a look at our options.
Continuing or Restarting Numbered lists
Look at the second section of words, starting with “Brouhaha.” It is clear that this list should not be starting over; it should be a continuation of the previous list. This is a simple fix.
Right click on top of the number 1 next to the word Brouhaha.
Select Continue Numbering
This will pick up the value from the previous numbered list. What if the opposite happens? Word guesses that you would like to continue numbering, but you actually intend to start over? Easy peasy! Follow the same process, but this time select Restart at 1.
Additionally, occasionally when you insert a numbered list, you will see a lightening bolt appear with a dropdown arrow. This is just another way to access the same feature, a shortcut inserted by Word that will allow you to make the decision whether to continue numbering or restart at 1.
Change Number Values
There is also an option in this menu to Set Numbering Value. This option is for those times when you need a special number, perhaps one that is out of sequence with the rest of your numbered list.
Formatting Numbered Lists
Sometimes you create a lovely numbered list, and for whatever reason, Word picks up on formatting from a previous line of text, making all the numbers bold, or a previously used color.
On the exercise document, look at the third section. Someone used a blue bold font for the text above the numbered list, and Word assumed that this should apply to the numbers on the list. To fix this, let’s take a closer look at that right click menu.
Right click on top of the first blue number, next to “Taradiddle”
Attached to the numbering options in a separate section is the ability to change the formatting: to remove the bold formatting and recolor the text.
Note: sometimes these options appear above the numbering options, sometimes they are below.
Sub Points
Creating Sub Points
In the last section, numbers 4 and 5 should be sub points of number 3. To demote them to sub point click to the left of “Our Friends,” and hit tab on your keyboard. Do the same for “Our Neighbors.”
This has created sub points, and Word assumed that you would like to indicate sub points with lowercase alphabet:
If the alphabet isn’t your goal, you can always click into the text in the line of a or b, go the numbered list dropdown in the Paragraph group of the Home tab, and select a different format. Maybe Roman numerals?
Promoting Sub Points
By the way, how do you change your mind and promote a sub point back to being a main point? Well, you could use the Decrease Indent (left arrow) in the Paragraph group…
But you all know I am a fan of shortcuts, and my favorite one for this purpose is shift + tab.
Thoughts?
Have numbered lists caused you trouble in the past? Will any of these tips help you going forward? I would love to hear from you!
Congratulations, Power Users!
Congratulations to our newest Power Users! For the full gallery, and more information about the WSU Microsoft Office Power User Program, please visit: wichita.edu/poweruser
I have been including this as a bonus exercise in our Pivot Table sessions, but it is too good not to share as a Byte. I learned about this magical feature (wizardry) from a session taught by Mr. Excel last fall. This is the beginning of the cool AI features to come with Microsoft Office… it is an amazing tool to help you better illustrate location oriented data, or better yet, location data on a timeline. Let’s check it out.
Availability
This feature is available to those of you using the Windows version of Microsoft Office 2016 or later. WSU faculty and staff, if you have an older version of Office and would like to upgrade, please contact the Help Desk at 4357. If you are a Mac user and want to try out this feature, please come to one of our open labs listed in myTraining! We would love to have you, and you will be able to export the data we create for use in presentations.
This is a list of fictional student registrations: student hometowns, class, and the date they registered.
Data Layout
Notice how this list is laid out vertically: each column is a new piece of information and each new row is a separate entry. This is exactly how data should be laid out in Excel: for pivot tables, for graphing, and also for geographic data.
Oh, and remember… friends don’t let friends merge cells. It can really mess with features that create visual elements with data… But I digress.
Creating the Map
Just like with your pivot table data, you do not need to preselect all this information.
Place your cursor anywhere inside the data. I selected cell B5 randomly.
Go to the Insert tab, and in a group called Tours select 3D Map.
Note: if this is your first time using this feature, you may be asked if you want to enable this feature. You do. This is going to give Excel permission to access these maps online.
Another Note: it may take a few moments for the feature to run… so don’t be alarmed if you see the famous spinning wheel.
A new screen will load with a map view. You can move the globe around with your mouse, or zoom in with the + and – buttons at the lower right.
Adjusting the Map
We want to see more information than just data points, though. Notice that the right side of the screen has an almost pivot table feel: with different groups of customizable information. Let’s insert a couple fields:
Press the + next to Category and select Class
Press the + next to Time and select Date
Now rotate your globe, and notice that there is dimension to the entry points…
but that is not all you have just done…
Notice there is a play button at the bottom of your screen. Press this button to see a moving timeline of registrations.
Isn’t this awesome??
Export Options
Take a look at the ribbon in the Map view. Notice the second option allows you to Create Video or Capture Screen. Maybe you would like to incorporate this live timeline into a PowerPoint, or maybe you just need a quick picture of the map. These options will allow you to do just that.
Saving Your Maps
This file is going to save with your excel file once you exit the map view. To access it again after closing out of map view, revisit the Insert tab, and select 3D Maps. Instead of starting over, this also gives you the option to revisit the “tour” you created. You might choose to create several!
Thoughts?
I would love to hear how you end up using 3D maps in your work space! Let me know. 😊
Congratulations, Power Users!
Congratulations to our newest Power Users! For the full gallery, and more information about the WSU Microsoft Office Power User Program, please visit: wichita.edu/poweruser
Microsoft templates are a mystery to a lot of people. Maybe you have found a way to save a file as a template. You noticed a new type of extension appear at the end of the file… but for the most part you see it behaving the same as a regular office file. So you wonder, what is the big deal with templates? I have to let you in on a secret. The usefulness of template files is all about where they are saved. And… they can actually be a timesaving lifesaver in a pinch, especially for repetitive work. Let’s explore how templates work in MS Office.
Exercise Files
This process will work the same in Excel, Word and PowerPoint; here are some sample templates to try out for each program:
p.s. This awesome PowerPoint template is available through the Strategic Communications Templates page. I hear that more will be coming soon, so stay tuned!
Open the File
Let’s open one of the files, the Word Template. Let’s say this is a file you had spent a lot of time creating; from selecting a theme and color palette, to tweaking the Styles to creating a dynamic Table of Contents. (More on those options for a future Byte).
Save As
Go to File and select Save As (or a lot of you know that my favorite shortcut for a quick Save As screen is F12). Location doesn’t matter, because that is about to change when we select type.
In the Save as Type dropdown menu, select Word Template.
Notice this changes the default location of your save to Custom Office Templates Folder.This is important: do not change this save location! This is where Word will look for your template.
Press Save.
Access Your Personal Templates
Let’s test out your new template!
Go to File and select New. You are creating an entirely new Word document, just like you would in the future when starting from scratch.
At the top of the templates, notice you now have a Personal tab. Press this button.
You should see your new template, the Office Bytes Template. Select this to apply the template to your new Word document.
Notice how this brings in not only the content, but all the themes, colors, fonts and styles.
This will work the same way with your PowerPoint and Excel file examples. Give it a try!
Thoughts?
Do you have a handy use for templates like this in your office?
Congratulations, Power Users!
Congratulations to our newest Power Users! For the full gallery, and more information about the WSU Microsoft Office Power User Program, please visit: wichita.edu/poweruser